Jeff Stuart Saltzman - Mix Prep
From MusicTechWiki
Revision as of 22:00, 1 February 2022 by BruceTambling (talk | contribs)
Revision as of 22:00, 1 February 2022 by BruceTambling (talk | contribs)
To check out the Jeff Stuart Saltzman Podcast Interview on Mix Prep go here.
Contents
- 1 Detailed Mix Preparation Guidelines by Jeff Stuart Saltzman
- 1.1 1. Strip Out All Automation
- 1.2 2. Remove Most Plugins
- 1.3 3. Shut Off and Hide Unused Tracks
- 1.4 4. Remove Master Fader and Aux Sends
- 1.5 5. Rename Tracks
- 1.6 Examples of naming:
- 1.7 6. Fix Clicks and Pops
- 1.8 7. Stereo Tracks
- 1.9 8. Edit and Mix Page Views
- 1.10 9. Test and Check
- 1.11 10.Color code tracks
- 1.12 11. Clip Based Gain
- 1.13 Screenshots
Detailed Mix Preparation Guidelines by Jeff Stuart Saltzman
Before doing all of this make a rough mix MP3 (and include it in the session for me) of the the last thing you were listening to so that I have a pretty good reference.
1. Strip Out All Automation
- This would include the deletion of all breakpoints in the automation timeline on the Volume, Mute, and Pan pages.
- Double check this as some control surfaces generate these randomly.
- If there is automation that is integral to the song (carefully crafted dramatic volume swells on a given track for example) either leave it in with a reminder in the notes section(dbl click track name) or buss (record) that channel or section to another new track.
2. Remove Most Plugins
- (unless you are trying to point me in a certain direction sonically).
- If something is artistically necessary (like a reverb or delay on certain vocal phrases) keep it in though it's better to just buss it to another track or Freeze/Commit and shut off and hide the clearly named original source.
3. Shut Off and Hide Unused Tracks
- Shut off (control/apple click on horn icon @ bottom of the channel on the mix page)
- Hide any tracks that are not going to be in the mix.
- Also, make sure all tracks that are hidden are actually shut off. (Inactive)
4. Remove Master Fader and Aux Sends
- Remove Master Fader(s)
- Remove all Reverb/Delay Aux sends.
- ((again—freeze/commit sends that are artistically integral)
5. Rename Tracks
- Rename tracks with names no longer than 6 characters and
- No caps (except denoting mic type---more below...) or
- No playlist #'s.
- Use upper case/lower case to differentiate new word.
- I do not need to know names of performers or type of instruments in most cases.
- Also, because of specific track coloring, it is not necessary to express the instrument.
- So for a lead guitar if the track is colored blue you can simply indicate “lead” or “fuzz” or “riff” etc.
Examples of naming:
- Kick Drum= k
- Snare Drum= sn
- Underneath Snare= snBTTM
- Rack Toms= r-t 1, r-t 2 etc.
- Floor Tom= f-t
- Overheads= oh
- Room= rm
- Percussion= perc
- Tambourine= tamb
- Shaker= shkr
- Bass.03= bass
- Electric Guitars: 52TeleJimDouble.06= egt1, egt2 etc.
- Guitar that enters in chorus'= crsgt1 etc.
- 12 String Guitar= 12gtr
- Multi-Mic'd Electric Guitars over several tracks: electricgtr1U87= egt1C (C for Condenser)
- electricgtr1SM57= egt1D (Dynamic)
- electricgtr1Royer= egt1R (Ribbon)
- two of the same mic type= egt1a, egt1b
- Distant Mic= egt1RM
- Acoustic Guitar= agtr
- Lead Guitar= lgtr
- Keyboards= keys
- Piano= pno
- Sequencer= seq
- Lead Vocals= lvoc
- Lead Vocal Double= lvDBL
- Harmony Vocals= hrm1 etc.
- Backround Vocals= bv1/bvHI (high part)/bvLO (low part)
You get the idea.... This is also the order that I would like to see the tracks from left to right.
6. Fix Clicks and Pops
- Please review all edit and/or cross-fade points with headphones in solo and make sure to fix any "clicks."
7. Stereo Tracks
Put any paired tracks (overheads, stereo keyboards, stereo rooms) that reside on separate mono channels on dedicated stereo tracks.
8. Edit and Mix Page Views
- Make sure the Mix Page shows:
- Both sets of Inserts
- And only first set of Aux Sends.
- The Edit Page should show
- I/O and Inserts only
- No Aux's or Comments.
- Hide the Tempo Editor as well.
9. Test and Check
- Before making the zipped file or loading the hard drive w/ the ProTools files destined for mixing:
- Try opening the sessions with all peripheral recording drives unmounted
- Or---even better---on another computer with PT to make sure all files are recognized.
10.Color code tracks
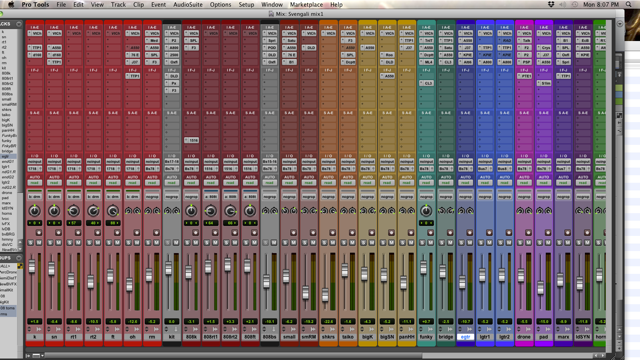
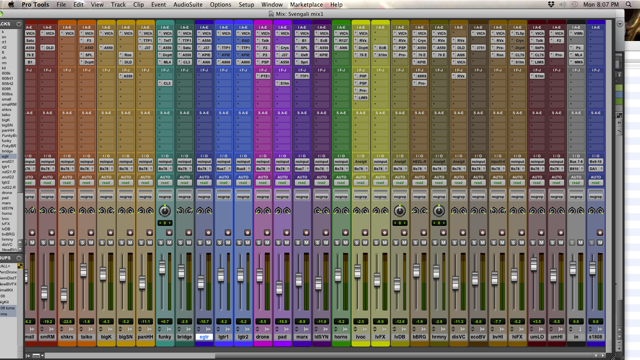
Not necessary but certainly helpful: Shift/Control/Click on color bar at the bottom of the Mix page between Track Name and Comments. Highlight Track Name and select Color from palette.
- drums = red
- percussion = orange
- bass = blue/green (turquoise)
- electric gtrs=blue
- acoustic gtrs=light blue
- keys/misc=purple
- piano=pink
- horns/strings=green
- lvocs/dbls=yellow
- bvocs=dark yellow/brown
- auxs=select "none" in upper right of palette
11. Clip Based Gain
- Use Clip Based Gain (if available)
- Turn down tracks recorded “hot “ or close to digital “0” with clip gain.
- Channel Headroom is an important in my process.
Screenshots

